About Me

I started this blog at the urging of my AK friends to help relay my moving to WA. I'm hoping this blog will evolve into a place where I share my home-decorating/remodeling, craft projects, and adventures in dog-ownership.

Thanks for reading!!

Christina - wrangell.penguin@gmail.com

Wednesday, December 29, 2010

Taggie!

Cutest kid, this is my taggie actually being used!!!
 "Hud thanks you for teething relief"

So first Taggie... If you want an explanation of what a taggie actually is...
Conclusion is my friend Vanessa was having her first baby, and I of course wanted to commemorate the event by making something crafty.  And I've been working on my sewing skills, and this project came about.  (Also I had verification from a friend and my mother that taggies were totally "in" at the baby showers they'd been attending.)

Here's the process. I did...
My magazine pattern

Chalk drawing

Adding fleecy fabric to the other side

Lots of pinning, all my "too long" ribbons in there.


Finished!

So cute, have to show Hudson again!!!

Monday, December 20, 2010

Friday, December 10, 2010

Large Dog Bed

I've been wanting to make a dog bed for my 2 beasts for a while.


This is what I've been collecting for this process: 5 dog beds and stuffing from the other bed that the dogs tore up, old jeans, random fabric, some sewing skills (mostly straight lines).

Looking at patterns online none of them really were meeting my needs, i.e. STRAIGHT LINES, simple pattern, using up my scraps.  I took one of the old dog beds, turned it inside out, and decided "I can do that"

You can kind of see the old dog bed underneath, I had a large piece of green fabric that I folded in half and marked it.

Next I sewed my long jean pieces together= I cut the legs off, cut/ripped them in strips, then sewed them together end to end, as you can tell not paying too much attention to perfection...

This was the end result "vision"
Now to combine my edges with the top and bottom.  I basically sewed one end of my jean strip to the halfway mark on my folded fabric.

[insert explanatory drawing here]

Then continued sewing around the "top", got to the other halfway in the green fabric, (changed the thread and bobbin), and went back to the first side.

With one side left to sew I had to figure out how I would get all the stuffing inside.  The dogs have a history of taking the zippers off beds, and buttons are just asking to be eaten.
In my mind I decided that I would add an extender piece of fabric, that would get folded inside and keep all the stuffing in the bed...

That's the inside, you can see the "flap" in the bottom right.
Except I attached it wrong, I could have gone back to fix it, but I didn't think the dogs would notice too much, and it would still work, just not as aesthetically pleasing as I wanted.

For those of you who might actually want to use a pattern, here are some ideas: http://www.doggiestylish.com/store/Free-Patterns-For-Dog-Accessories/Free-Patterns-For-Dog-Beds
 

Friday, September 10, 2010

Map Deconstructions by Shannon Rankin

I know I keep saying "I could do that", but these look awesome and I could do that...

Map Deconstructions by Shannon Rankin: "


I just discovered the work of Shannon Rankin and I love what she’s doing! Her deconstructed maps are beautiful and the sheer number of works she has created is amazing. Currently, Shannon is raising funds for her first international show, check out her Kickstarter page if you’re interested in helping her out!


Via BLDGBLOG


"

Monday, September 6, 2010

Head Bands

So I had a crafty week with a friend, it was awesome.  And here is one of the projects we worked on together!!!  Headbands!!!


I had a bunch of t-shirt scraps (from my eventual t-shirt quilt), headbands - since they are too small for my head/lack of hair, and buttons my Busia sent me.  And with the help of lots of blogs, projects were begun.
Materials were gathered


And then I wanted to try one with ONLY buttons...


ta da!


Safe travels friend, until we craft again!!

Friday, September 3, 2010

kirra jamison

kirra jamison: "


i’m having a speechless art moment right now, courtesy of my favorite source for all things cool, deanne cheuk. over at the internetwork deanne posted about artist kirra jamison’s amazing artwork and i’m still stunned. when i clicked over to kirra’s site and saw the picture of these pieces full sized i wanted to cry they were so beautiful. hence, these pieces have immediately jumped directly to the top of my dream wish list. seriously, i’m emailing her gallery now and asking about prices so i can start a savings fund. i need to have one of these in my life- they’re too beautiful for words. click here to check out more of kirra’s work online.


"

Friday, August 27, 2010

Toilet paper roll wall art -- Check!

Cutting and laying out toilet paper rolls

Preparing to hot glue.


Isn't she pretty!!  I might have to keep saving toilet paper rolls and make another.


Where the idea originated...and how I did it...

Friday, August 13, 2010

Kitchen...

Yes still working on the kitchen, after painting the wall above my not very good caulking job, decided I want to cover the paint with word art.  So food quotes, words, other languages relating to eating all done in stenciling, free hand, glazes, paint.


I cleaned all the cabinet doors and it was pretty yucky, so I've decided we need cabinet hardware (not sure why greasy handles are better then greasy wood, but it's the logical solution in my mind.)
http://www.jenniferadamsdesignblog.com/2009/01/diy-cabinet-hardware.html
I like the button idea, possibly just finding cool textured buttons and then spray painting all the knobs the same color (blue of course). Or I could attach the extra 1" tiles I have to knobs and use those...  Possibilities.

Saturday, July 31, 2010

Mountains are DONE!!


Mountain Mural


And the rest of the room...

Newly shelved closet and organized outdoor gear
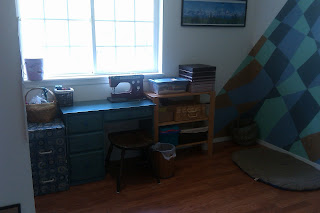
My sewing desk.

Door = Craft Table

These are in progress pics, I'll show the final picture hopefully by this afternoon...


 The door, half painted blue, the other side painted with black chalkboard paint...


The legs, why yes I spray-painted those metallic blue (my current FAVORITE color.)


Last night, after trimming the door down to 65" long (80" just wasn't going to work with the new placement. Hollow core doors really are hollow, just some cardboard inside...) And adding another coat of polyurethane...


This morning we add legs! (You can see my window I bought at the ReStore in the background, that's going to be a fun front porch project.)

 Legs are added, moved it to the room, and start the process of figuring out how to attach the joints to the wall.
T measuring/moving hinge.
And the final product!!

Well we're going to add a little hinge so it'll stay up and have a usable chalkboard.

In the up position...